
This blog post will, in a roundabout way, provide you with a step by step guide on how to transform your garden into a beach themed retreat – with a bit (a lot) of unnecessary waffle in between!
So where do I start? I guess the beginning is as good a place as any.
Just to recap, for those I haven’t bored with the fact I got myself a garden office which effectively very quickly transformed into a beach themed she shed. Once erected it looked a bit odd and stuck out a bit like a sore finger at the bottom of my garden. I needed to do something drastically to blend it in somehow.


Being the kind of person that likes to try new things and being able to turn my hand at most things – what’s that saying ‘Jack of all trades, master of none’ – I thought I could try my hand at a touch of landscaping. After all it’s pretty easy these days to pick up new skills when you have the world wide web on hand. You can get information on virtually anything and good old YouTube never lets you down when you need a visual aid.
So you may remember from my previous ‘Cake Fail’ post the importance of preparation in everything and how failing to prepare quite often means you need to be prepared to fail. Worry not, this time I properly prepared!
Below is a step by step guide on how I transformed my outside space!
Step 1:
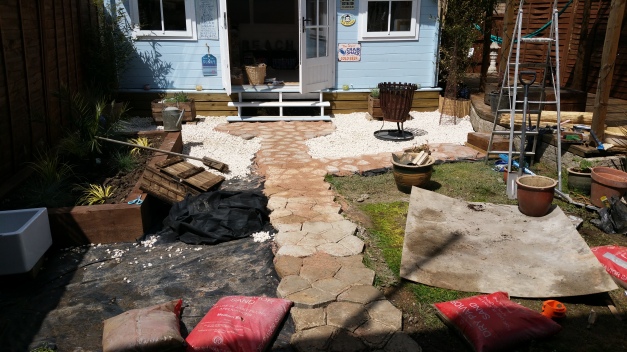
Start with a blank canvas!

Garden on moving into property
The picture above is what my outside space looked like on moving into the property. I had made a few alterations on moving in like scattering a LOT of grass seed for obvious reasons, decking the area to the right and outside the back door, which you can’t see in this photo and I also erected an 8ft x 6ft shed in the space on the right – years later this was transformed to ‘Danny’s Beach Bar’ !
Step 2:
Build a beach themed log cabin in your garden that stands out like a sore thumb! (see previous blog posts)

Step 3:
Start the prep by brainstorming (not sure if it’s called brainstorming when you do it alone).
Don’t underestimate step 3 as I would argue that preparation is the most important stage and you need to take your time and not rush into anything. Unless of course you’re like me and have zero patience and once an idea is planted in my head I jump 24/7 into it!
First you need to think about:
- What you want out of the space
- What features you desire
- What features are necessary
I would strongly recommend making a mood board – basically cut out pictures of things, design features, materials etc you would like in your space and put them all on a board, whether it be physical or virtual. It’s helpful at this point to do a bit of window shopping, start off online to know what’s out there but I always think it’s important to also see the materials in the flesh. I’m a very tactile person so I like to feel the quality of the raw materials. With today’s modern smart phone it’s easy to take pictures of items you would like – I always take a pic of it next to the price tag as it’s a good reference later on when comparing prices or wanting to know where it was you saw it.
Pinterest is a great tool to make online mood boards and I strongly recommend you download the app or whatever you call it where you can pin pictures from any website to your board. This is invaluable while doing your online browsing of ideas and places to buy things as everything will be kept in one folder. If your creative juices are a bit dry then Pinterest is also a good place to get ideas.

Sometimes you’ll have an idea and vision and doing your research can help formulate it but other times you need to look for inspiration and that inspiration helps you to formulate it.
I kind of had an idea/vision in my head and pinned a few ideas on Pinterest (my Garden Idea’s Board) and took photos of products I saw while out and about. I wouldn’t recommend storing all your ideas in your head as leakages can occur!
Step 4:
Plan.
The next stage is closely related to the last stage, once you’ve collated your ideas you then need to start looking at which ideas are going to work and which ideas need shelving. I am a visual person so I scribbled out a sketch of how I wanted it to be – it was a 2 minute job and will win no design or nice handwriting awards!

This was probably the first plan I drew but the next stage involves measuring and pricing up and during this stage it may be necessary to make amends to the original plan, I certainly did and there will be several more drawings than this one with amen
dments until I got the final plan.
Step 5:
We are still in the preparation stage, I’ve pretty much got myself a plan and what I want
 but I now need to look at the finer detail of how to go about doing it. I found youtube was a great way to find out how to do certain things and assess if I thought I could do it or if I’d need to employ a big burly bloke who would know what they were doing. I also got advice from tradesmen.
Step 6:
Right here is where the real fun or rather hard labour begins! I’m going to break it down into different parts.
Crazy Paving Moulds
One of the main  things I wanted to do was make my own crazy paving style slabs. I had seen these paving moulds on Pinterest while in Step 3 of the prep! They seem to be the thing stateside but in the UK they are hard to source, however once I get an idea I don’t let go of it very easily and don’t give up until I get what I want and I managed to source one from my old mate ebay, I do find him awfully resourceful.
I was strongly advised to make a good solid foundation which would have involved digging and laying a foundation layer of sand, rubble etc but the reason I liked the idea of this mould was that in all the youtube video’s I watched you just plonk it down where you want the path and pour in cement and supposedly ‘Bob’s your uncle’. As for uneven ground well the cement will sort that all out!
I was still told by a good friend that during the winter my path would sink and become uneven. I mused over it thinking that most the videos I saw of people using it probably emanated from hot countries where they are not blessed with our ever changing fluctuations in weather but being the impatient type and if I’m honest, a bit on the lazy side when it comes to hard labour, and a cheapskate – the rubble and sand costs money, I decided to ignore rather than heed this advice and trotted off to the helpful guys at my local B&Q for some cement.
Now there is the ready mixed stuff where you just add water but it’s pretty extortionate, well to me it is. At the same time I didn’t want to hire a cement mixer and I kinder knew what hard labour mixing cement mix can be so I did a bit of lateral thinking and decided to get some post mix from my local timbers yard, a bit of chatting up and it’s surprising what discounts you can get!
So I am now at the stage where I have what I need – my mould, post mix, a board to mix it on, water, a trowl and a shovel and I even lay a bit of string between point A and B like I knew what I was doing, of where I wanted the path to travel. And we’re off…
Now, I don’t think I’ve ever really mixed cement before apart from as a kid when I saw a builder do it and was curious and asked him if I could have a go. But it’s one of those things that is a lot easier to watch than to do, well if you are lacking in fitness and a bit of muscle so that’s where my long suffering partner comes to the rescue and I recruited him to provide a bit of brawn into the mix. For anyone wanting to get fit then forget the gym membership, just go and mix some cement!
So first batch mixed up, I poured it into the mould. It looked way too lumpy – hint post mix is for posts and not as a cheap replacement to cement! I really wasn’t happy with it so off I pop to buy myself some sand and cement mix to add into the post mix to make it less lumpy.
Now I’m a bit like a man when it comes to instructions and I just guess, I never measure anything when it comes to cooking and have always been pretty good at guessing so I get going with mixing up the post mix (after all I don’t want to waste it as it cost money), sand and cement powder and because I’ve never really made cement before I have no clue if what I am mixing is right, plus the fact it’s a lot darker before it dries so each mould full I mix is slightly different amounts until I get it right and after about 9 times I find the recipe that I think is optimal! Now this is not ideal as when it dries I can see that each batch is a different tone! I think I have the solution as can move about some of the pieces from each mould-full and mix and match! One problem with this – each individual piece has moulded to that particular piece of ground so If I move it to lie on another piece of ground then it doesn’t fit on the ground and is uneven, unless you spend ages trying to fit the ground to that piece so I just have to deal with it being different shades – not good for my OCD but oh well.


Oh and the beauty of making them yourself is that you can personalise them, so in random one’s I put my handprint, I also put a few shells in one or two of them. Handprints are great if you have young kids as they can get involved and be a part of the garden in years to come. Perhaps not so great if you are planning on selling your property in the next few years though as doubt new owners will be as sentimental over the prints as you!
I didn’t do the paving all in one go because quite frankly it was quite back breaking even though me and Danny took it in turns to mix it up, plus the fact you have to allow for the change in weather so I did two or three at a time.


And can I just say in hindsight – oh what a beautiful thing that is! – I think the post mix could have worked as when it dr ied it looked a lot better and a bit bumpy is good for texture!
The final step in this process was filling in the gaps with sand, now I would have chosen a nice pale colour sand had it not been for the lovely guys at the timber yard who were kind enough to donate about 8 bags of sand – a smile goes a long way! It was quite a bright orange colour which wasn’t the colour I’d have picked but hey it was free and it was reminiscent of all my lovely travels in Australia with the lovely rich red soil you find!
I did find the sand helped to even out the colour difference of the paving!
Laying the cotswold stone
In between this labour intensive task I took a rest with the less strenuous task of covering my whole garden in that black landscaping material you can get. Obviously being a spendthrift I went for the lowest cost but PLEASE PLEASE PLEASE do not be like me and go for the thickest and best quality you can unless you enjoy spending your days pulling out weeds. Again in hindsight, I should have really covered the area where the paving was going too as now we get lovely weeds and grass growing through! Not the look I was after! I did think half way through about it so some of the path has this underneath and some doesn’t and it does make a difference.
After covering all the area’s I could I went on to shovel the tonne of cotswold chippings I’d ordered and were delivered on my drive into a wheelbarrow to transport it to the back and basically cover all the black landscaping material. I chose Cotswold stones as they are lovely and white, well they can go a creamy yellowy colour and at the moment one year on some have gone a bit green! Anyway, after looking at all the stones available I decided these would give it the beach look I was after.
Once down, the garden really was beginning to take shape and look beachy and just needed the finishing touches.
The railway sleeper flower bed
Although I wanted a low maintenance garden, I still wanted some plants as I think a garden without plants would be sad. Plants do so much for us so would be rude not to so I had a little look at the kinds of plants you find at the beach and found all sorts of grasses that would survive. I also knew I wanted bamboo as I’ve always loved bamboo but will talk about that in the next step.
Now loving all things rustic, I would have loved the flower bed to be made of authentic railway sleepers but have you seen the cost of these? So I settled for the next best thing, new sleepers. After measuring up, I asked the timber yard to cut them to the size I wanted and the rest was all pretty simple to do. I basically lay them down where I wanted them and then screwed brackets in to keep them in place. I then had a load of plastic sheeting which was what the wood and materials for my beach hut came in so I used this to line the flowerbed.
I then tidied up the garden a bit by throwing any bits of rubble from taking down a small brick wall when building the beach hut, bits of cement I had from building the path, other bits of leftover bits which I just threw in to use as hardcore. I then dug all the uneven bits of the garden and threw the soil in and before I knew it I’d kind of filled the bed without having to get any topsoil. Also luckily the local council tweeted or used some form of social media to say they were going to be at the Riverside carpark on a set date with a load of topsoil if anyone wanted it. Great stuff, I went and got a load, it was really lovely soil too with lots of nutrients in (I could tell from the stench!). I then went about planning a few grasses and one of those plants that look like mini palm trees.

Bamboo
Oooooh, I was so excited that I was going to have bamboo in my garden, oooh the sound of it when the gentle breeze russels through the leaves, and for those that had bamboo in their garden and found it to have a life of it’s own and uncontrollable were so excited that I was going to take their bamboo away! Namely Danny’s brother who lives near Basingstoke. Now at the same time I saw some in B&Q that had been reduced from £30-40 to £10 as it looked a bit weary and on it’s way out of this world. I thought it was worth a try to revive it so went to buy it only they informed me a customer had already bought it and they were waiting for them to pick it up. On my way home I went to my local B&Q and went and looked at the bamboo and there were a few plants with some dead leaves and were looking a bit sorry for themselves so I found the guy in charge of that section and asked if I can have the plants for a tenner each as I’d seen some at another B&Q for that. This guy instantly became my best friend when he not only gave me the right answer but he then offered me a few plants for a tenner which quite frankly were in quite good condition. So all in all I had double the amount of bamboo I was planning on but oh, how happy was I! Sorry small things and all that! And can I say there’s a happy ending with all the bamboo I planted, even though some was close to saying goodbye to the world, it’s all flourishing beautifully!
Old apple crate lavender beds
So as you’ll see from my previous post, I managed to get my hands on some authentic 1970’s apple crates that were just beautiful – well in my eyes, so a bit of woodworm killer, preservative and wood oil later, two of them were to become beds for lavender. Once prepped then I used some more of that plastic I had left over to line them, filled it with soil mixed with compost and some stones in the bottom for good drainage and planted 3 lavender plants in each – oooh I do like the smell of lavender and also the lovely flowers it produces, and that was it job done, they really did look the part! These were mounted on some of the rubble I had left over and hanging around – yes I really do like to use what I can!
Finishing Touches
So once all the above was done, things had really taken shape and now was the time to titivate. Firstly I put a load of sand under the steps and used my shell collection from all over the world to make a little beach under the steps.
I enlisted the lovely Danny to paint the fence with the same shade used to paint the sleepers.

I then went a bit crazy with solar lights as if they were going out of fashion and wrapped a load around my pagoda – won’t go into this area too much as that will be another blog post! Put lights lining the beach hut, lights in the flowerbed, lights running down the path and fence lights.
Now it was almost finished the BBQ was moved into place along with the belfast sink which would come in handy for BBQ’s. Basically pop the plug in, fill with ice, fill with beer and there you have it. Once the ice melts take out the plug and the water drains away – simples!
At a later date I made a table/ledge out of pallets that can be used to put the meats, condiments on when having a BBQ but will do another blog post for this.
And then I had some big pots with plants in so I strategically placed these in the garden and voila! My very own beach retreat garden!

So what do you think? Before or after?
